
When you are organizing a closet, cupboard, or drawer, you need to remove every single item in order to organize it well. Get all the tips you need to be able to organize your space like a pro!

Organizing for me is super easy. So easy that it all seems so simple and obvious that it seems absurd to even share how I do things because it seems so obvious to me. I have come to realize, however, that it isn’t. I am aware of the phrase, “Those who can’t do, teach.” Organizing is so intuitive to me that it is hard to figure out how to teach people how to make it easier for them. But I have been brainstorming! I have been paying attention! I hope this tip will be useful to you and not just a “duh” tip.
The absolute best way to organize, de-clutter, and clean up a space is to remove everything from it. You really just take it all out and then put it all back. Do you really need to get rid of some of your clothes? Remove them all from your closet and drawers and evaluate each one as you put it back. Does your bathroom drawer need some attention? Take everything out and put it all back in.
Every time we have moved, I have commented that moving is the best way to get rid of stuff. Removing everything is the closest you can come to moving without having to actually move.
Now, I know this is an overwhelming thing to do! You get it all out and along comes a toddler who really mixes things up. If you are doing an entire closet, that is a lot of stuff strewn about your house, and what if you have to stop in the middle? Then you have a gigantic mess on your hands.
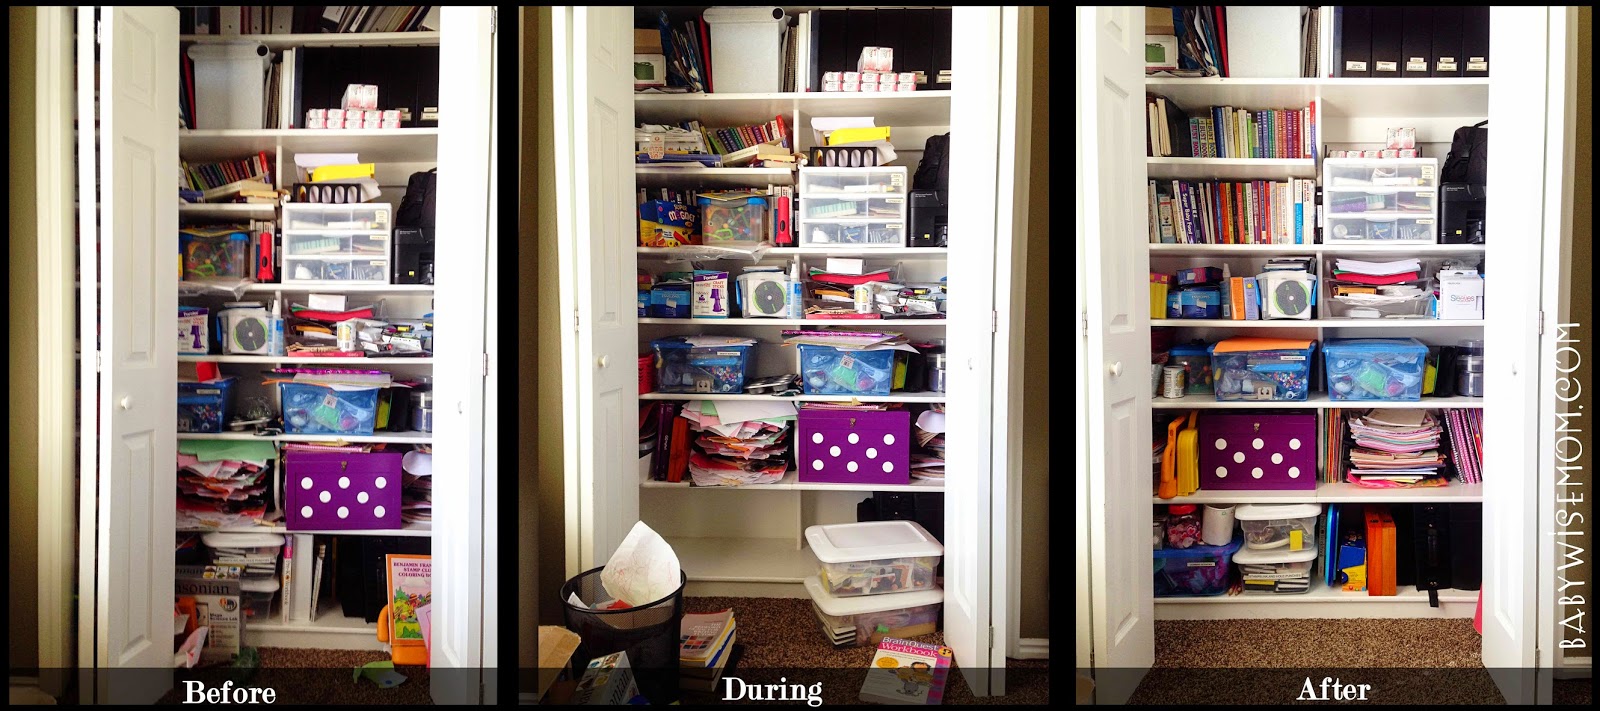
This past weekend, I reorganized my closet in my office. Here are the steps I took:
- Start With a Clean Room: I started off by cleaning the office. Before you have piles of stuff around the room, you want the room to start clean so you know everything out goes either back in the space, into the garbage can, into a goodwill pile, or into some other space.
- Start When You Don’t have “Help”: I waited until Brinley’s independent playtime. I definitely did not want her input on the reorganizing of the closet. There are plenty of things I have her help with even though it makes it harder. Organizing with a toddler is really just setting yourself up for frustration. As soon as she started her playtime, I started my project. You might wan to wait for a nap if you need more time for your project.
- Take it a Bit at a Time: I organize this closet frequently. Because of that, I knew I didn’t need a whole closet rehaul. I just needed to tidy up. I took it one shelf at a time. I removed everything from the bottom shelf, wiped the shelf off, and then put things back on the shelf I knew I wanted there. If you need to totally revamp the space, it is best to remove it all at once. It will give you a blank slate and allow you to be creative and innovative in how to organize your stuff. Once my bottom shelf was done, I moved up to the next shelf.
- Throw Stuff Away/Donate: Don’t be afraid to throw things away. And have the garbage can right there. I save a LOT of stuff. I come from a line of farmers. My grandparents remember the Great Depression well. I am all about reusing, saving for a rainy day, and taking good care of things. I keep more than the average person I am sure. Even still, there will be things that just are not useful to you any more and can either be thrown out or donated.
- Make it Kid Friendly: The reason I have to do this closet so often is that I have children. My children use this closet for a lot of things. I am constantly having to tweak the set up so that they can get things out easily and more importantly, clean the stuff up independently. I am a master at fitting things into the space provided, but my children do not yet have that skill set. Things need to be set up so a child can get it back the way it was. It can’t be a 3D puzzle. If you look at my picture below, you will notice the purple chest was moved. The previous location was next to a bunch of coloring books. Every time the chest was removed, the coloring books fell over and it was hard to get the chest back in its place. This was a major problem because that chest holds Kaitlyn’s art stuff. She uses it constantly (by the way, this is an excellent way for her and I to compromise; artists are by nature usually less organized. She can have her chaos in her chest and I can have my closet clean(er)). I moved the chest to a new spot so that noting will fall over when she removes it.
- Label Things: Label makers can be nerdy, but they are so fun! I love labeling my containers so it is easier for other people to know where things go.
- Clean Up: You aren’t done until it is all put away. Take out the trash and make sure your room is back to clean when you are done.
- Require Family to Be Good Citizens: You have to realize things will get messed up, and most likely no one else will be as good about putting things away nicely as you are; however, you can require that they put things where they got them from. You can require the best they can do. That is being a good citizen, kind to your mother, and being a good family member.
Related Posts
- Toy Storage Ideas for Families
- Tips for Managing the Paper Influx from School
- Storage Caddy for Organizing Nursing Supplies
- Organizing Kids Crafts and Memories
I always like to read your post regarding organization. Thanks for your time to teach and share! I find myself the hardest time is to organize different kinds of bags. Purse, shoulder, backpacks…etc. Plastic, paper, groceries, hard, big and small… If you can have a post regarding it, that would be GREAT! Thanks again for the tips!